Introduction to Oracle BI Cloud Service : Creating the Repository
Earlier in this series we’ve looked at the overall product proposition for Oracle BI Cloud Service (BICS), and how you upload data to the Database Schema Service that comes with it. Today, we’re going to look at what’s involved in creating the BI Repository that holds the metadata about your logical tables, calculations and dimension hierarchies, using the new thin-client data modeller that like the rest of BICS runs entirely within your web browser. For anyone coming into the series mid-way, here’s the links to the other posts in the series:
- Introduction to Oracle BI Cloud Service : Product Overview
- Introduction to Oracle BI Cloud Service : Provisioning Data
- Introduction to Oracle BI Cloud Service : Creating the Repository
- Introduction to Oracle BI Cloud Service : Building Dashboards & Reports
- Introduction to Oracle BI Cloud Service : Service Administration
So anyone familiar with OBIEE will know that a central part of the product, and the part of it that makes it easy for users to work with their data, is the business-orientated semantic model that you create over your source data. Held within what’s called the “BI Repository” and made-up of physical, logical and presentation layers, the semantic model turns what can be a complex set of source tables, joins and cross-application links into a simple to understand set of subject areas made up of fact tables and dimensions. Regular on-premise OBIEE semantic models can get pretty complex, with joins across different database types, logical tables with several different ways you can provide their data - for example, at detail-level from an Oracle data warehouse whilst at summary level, from an Essbase cube, and to edit them you use a dedicated Windows development tool called BI Administration.
Allowing these complex data models, and having a dependency on a Windows-based development tool, poses two main issues for any consumer-style version of OBIEE; first, if the aim of the service is to attract customers who want to create their systems “self-service”, you’ve got to made the repository development process a lot simpler than it currently is - you can’t expect customers to go on a course or buy my excellent book when they just want to get a dashboard up and running with the minimum fuss. You also can’t realistically expect them to install a Windows-only development tool back at the office as most of their target customers won’t have admin privileges on their workstations, or they might even be using Macs or work out of a browser; and then, even if they get it installed you’ll need to ensure there’s a network connection available to the BI Server in the cloud through their corporate firewall. Clearly, a browser-based repository creation tool was needed, ideally one that did some of the basic work automatically for the user and didn’t need hours or days of training to understand. Of course, the risk to this is that you create a repository editing tool that’s too “dumbed-down” for most developers to find useful, and we’ll consider that possibility later in the article.
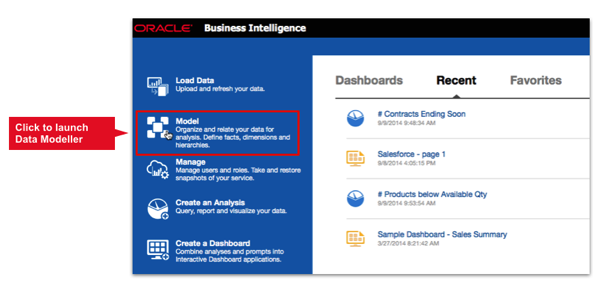
So following the data upload process that we covered in yesterday’s post, we’re now in a position where we’ve got a number of tables sitting in Oracle Database Schema Service, and we’re ready to build a repository to report against them. To access the thin-client data modeller you click on the Model menu item on the BICS homepage, as shown in the screenshot below.
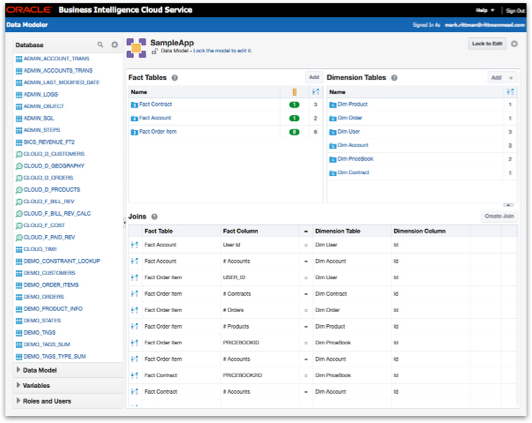
The modeller itself supports a simplified subset of what you can create with the full BI Administration tool. You’ve got a single source, the Oracle Database Schema Service, and a single business model. Business model tables have a logical table source as you’d normally expect, but just the one LTS is currently supported. Calculations within logical tables are supported, but they’re logical-level only (i.e. post-aggregation) with no current support for physical-level (pre-aggregation) at this point.
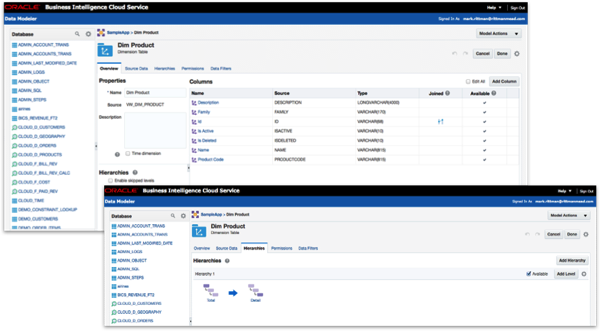
Level-based hierarchies within the business model are supported, including skip-level and ragged ones, and there’s support for time-series dimensions including their own editor.
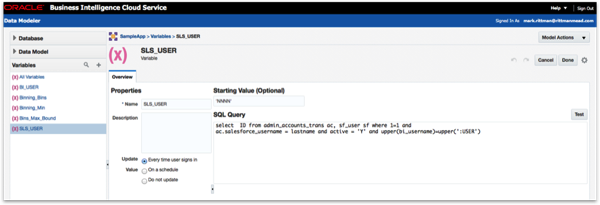
Where possible, introspection is used when creating the business model components, with table joins and matching column names used to create candidate logical joins. Static and dynamic repository variables, along with session variables are supported, with the front-end also supporting presentation and request variables - so all good there.
Under the covers, each tenant within BICS has their own RPD and their own catalog, and any edits to the repository that you perform are effectively “online” edits. To make edits to an existing model the developer therefore has to first “lock” the model, make their changes and add their new entries and then validate them, and then either revert the model or publish the changes.
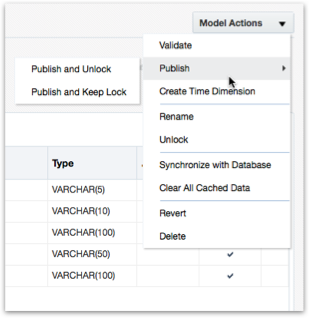
In the background BICS updates the RPD using the metadata web service API for the BI Server, with the RPD it creates the same format as the ones we create on-premise, just with a smaller set of features supported through the thin-client admin tool.
As I mentioned in the first post in the series, each tenant install of BICS comes with two instances; one for development or pre-prod and one for production. To move a completed repository out of one environment into another a new feature called a “BI Archive” is used, a snapshot of your BICS system that includes both the repository, the catalog and any security objects you create. In this first version of BICS each import is total and overwrites everything that was in the instance beforehand, so there’s no incremental import or ability to selectively import just certain objects or certain reports into a new environment, meaning that you’ll lose any reports or dashboards created in production if you subsequently refresh it from dev/pre-prod - something to bear in-mind.
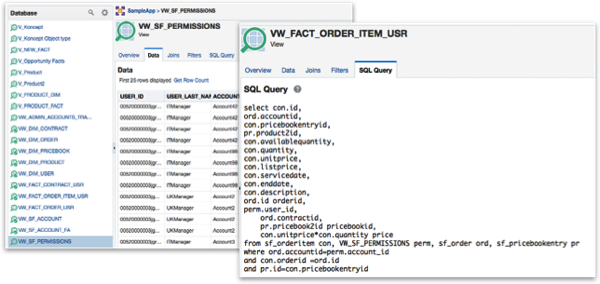
One other thing to be aware of is that there’s no ability to create alias tables or opaque views in the thin-client modeller, so if you want to create additional copies of dimension table for more than one dimension role, or you want to create a table using an arbitrary SELECT statement you’ll need to go into ApEx and create a database view instead - not a huge imposition as ApEx comes with tools for creating these pretty easily, but something that will lead to a more complex database model in-time. The screenshot below shows one such database view then exposed through the thin-client modeller, where you can see the SELECT statement behind it (but not alter or amend it except through ApEx).
Finally, the thin-client modeller supports row-level and subject area security, using filters or object permissions to set up manually or create by reference to application roles granted to your users. We’ll look at what’s involved in setting up security and application roles in the final post in this series, where we look at administering your BICS instance.
So, that’s a high-level view of the repository creation process; in tomorrow’s post, we’ll look at what’s involved in creating reports and dashboards.